10 Steps to Build a PVC Hydroponic System
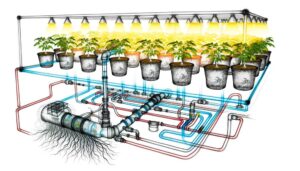
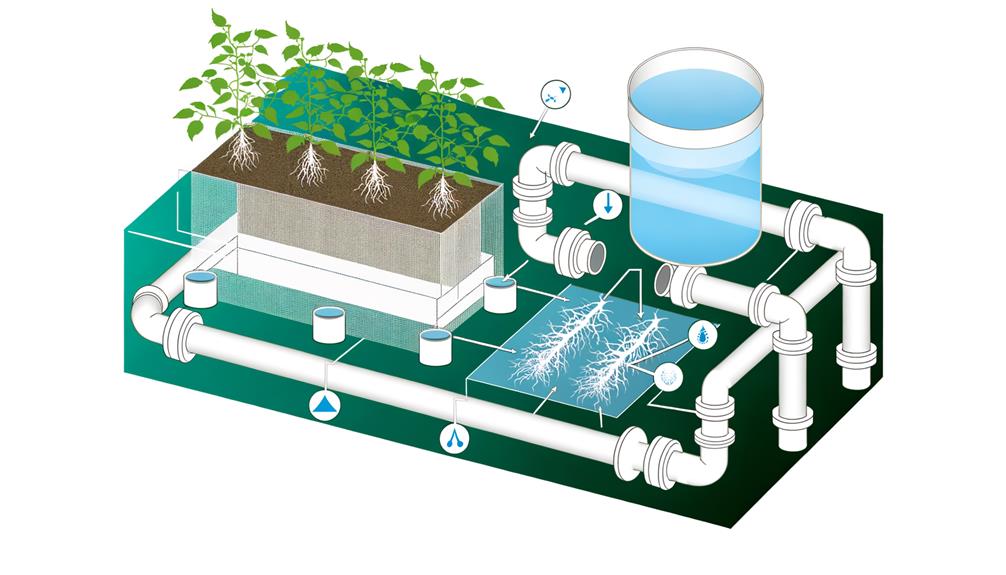
Building a PVC hydroponic system necessitates rigorous materials selection, including high-grade PVC pipes, compatible fittings, and a submersible pump rated at 400-800 GPH. Critical steps encompass spatially designed NFT or DWC configurations, precision-cut pipe segments, and methodical alignment using solvent cement for leak-proof connections.
Drill planting holes with a hole saw and guarantee fitment for net pots. Secure the pump in the nutrient reservoir, using watertight fittings, and mix a pH-balanced nutrient solution, maintaining an EC of 1.2-2.0 mS/cm.
Position rinsed seedlings in net pots and monitor environmental conditions like light intensity and temperature meticulously, as mastering these nuances releases superior plant growth.
Key Takeaways
- Gather high-grade PVC pipes, fittings, a submersible pump, net pots, and an opaque nutrient reservoir.
- Design the system layout for optimal light penetration, airflow, and scalability.
- Cut PVC pipes accurately and assemble them using primer and solvent cement.
- Drill planting holes with a power drill and ensure they align with net pot sizes.
Gather Your Materials

To initiate the construction of a PVC hydroponic system, it is imperative to meticulously assemble all necessary materials, including PVC pipes, fittings, submersible pumps, net pots, and a nutrient reservoir.
Precision in selecting high-grade PVC pipes and compatible fittings guarantees structural integrity and durability.
The submersible pump must be chosen based on its capacity to efficiently circulate the nutrient solution.
Net pots, ideally made of food-safe plastic, provide excellent support for plant roots.
The nutrient reservoir, preferably opaque to prevent algae growth, should be of adequate volume to sustain the entire system.
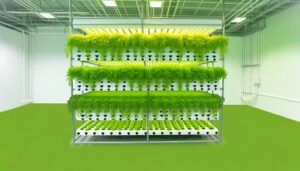
Design Your System
Designing your PVC hydroponic system necessitates a systematic approach to guarantee optimal plant growth and efficient nutrient delivery.
Begin by determining the spatial configuration, ensuring ideal light penetration and airflow.
Employ a nutrient film technique (NFT) or deep water culture (DWC) framework, tailored to your specific crop requirements.
Precision in the alignment of PVC pipes is essential to maintain consistent nutrient flow, preventing blockages and ensuring uniform distribution.
Integrate a reliable pump system to facilitate the continuous circulation of nutrient solution.
Utilize net pots and grow media to stabilize plant roots while enabling adequate nutrient absorption.
Consider scalability and modularity in your design to accommodate future expansion.
These elements collectively foster a robust, high-yield hydroponic environment.
Cut the PVC Pipes

Ensuring precise measurements, begin by marking the PVC pipes according to your hydroponic system's design specifications. Utilize a fine-tip marker and a measuring tape to delineate exact lengths.
Employ a miter saw or a pipe cutter for an accurate, clean cut, mitigating burrs that could obstruct water flow. Confirm that each segment aligns symmetrically with your blueprint to maintain system integrity.
Post-cutting, employ sandpaper to smooth rough edges, ensuring ideal pipe connectivity and avoiding potential leaks. This critical step necessitates meticulous attention to detail, as even minor discrepancies can impair system efficiency.
Precision in this phase translates directly to operational efficacy and longevity of your hydroponic setup, underscoring the paramount importance of exactitude in your cuts.
Assemble the Framework
To commence the framework assembly, it is essential to accurately cut and fit the PVC pipes according to the predetermined design specifications.
Utilize appropriate PVC connectors to guarantee each joint is securely fastened, thereby maintaining structural integrity.
Precision in these steps is vital to prevent any misalignment or potential leaks within the hydroponic system.
Cut and Fit Pipes
Begin by accurately measuring and marking the PVC pipes according to the specified dimensions in your hydroponic system blueprint.
Utilize a fine-tipped marker for precise markings and a measuring tape for exact measurements.
Employ a PVC pipe cutter or a fine-toothed saw to guarantee clean, precise cuts, thereby minimizing the risk of structural compromises.
Once cut, deburr the edges using a deburring tool or fine-grit sandpaper to guarantee smooth, clean edges that facilitate seamless joint connections.
Arrange the cut pipes according to the blueprint layout, verifying alignment and fitment before proceeding.
This meticulous approach guarantees structural integrity and ideal fluid dynamics within the hydroponic system, thereby enhancing overall system performance and longevity.
Secure With Connectors
With all pipes accurately cut and deburred, the next critical step involves securing them with connectors to assemble the hydroponic system's framework.
Utilize PVC fittings such as elbows, T-joints, and crosses to construct a robust and leak-proof structure. Verify each connection is seated firmly to prevent potential disjunctions, employing primer and solvent cement for permanent adhesion.
This process demands meticulous attention to alignment, as misaligned joints can compromise system integrity. Consider incorporating quick-disconnect fittings for sections requiring periodic maintenance.
Employ pipe clamps to stabilize the structure, especially in high-load areas. Precision in this stage guarantees a durable, efficient hydroponic framework capable of supporting ideal plant growth and nutrient delivery, aligning with the innovative objectives of hydroponic cultivation.
Drill Planting Holes
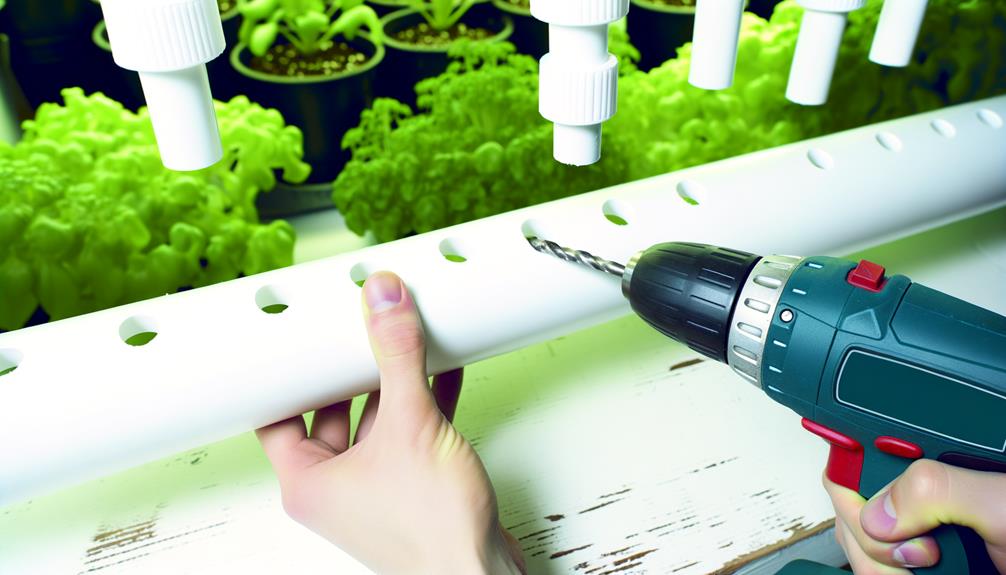
Accurately measuring and drilling planting holes is essential for guaranteeing proper plant spacing and ideal growth in your PVC hydroponic system.
Begin by marking the PVC pipes with a non-permanent marker, calculating the best distance between each hole based on the specific crop requirements.
Employ a power drill equipped with a hole saw attachment to create uniform apertures.
Confirm the diameter of each hole aligns precisely with the size of the net pots to be used.
Utilize a level to maintain alignment and prevent deviations, which could impact plant stability and nutrient flow.
After drilling, smooth the edges of each hole using a deburring tool to eliminate any sharp fragments that could damage plant roots or impede growth.
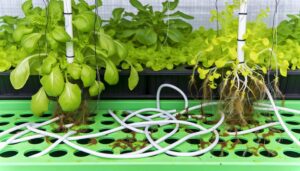
Install the Water Pump
To guarantee efficient nutrient circulation within your PVC hydroponic system, precisely position and secure the water pump at the base of the nutrient reservoir. This guarantees ideal water flow and distribution of nutrients to the plant roots. Select a submersible pump with a flow rate suitable for the system size. Connect the pump to the PVC piping using watertight fittings to avoid any leaks. Confirm electrical connections are insulated to prevent moisture ingress. The following table highlights essential parameters for installation:
| Parameter | Ideal Value | Notes |
|---|---|---|
| Flow Rate | 400-800 GPH | Depends on system size |
| Power Supply | 120V/60Hz | Confirm compatibility |
| Pipe Diameter | 1/2' to 1' | Based on pump output |
| Connection Type | Watertight | Use PTFE tape for sealing |
| Insulation | Waterproof | Prevents electrical hazards |
Following these guidelines will enhance system performance and longevity.
Add Nutrient Solution
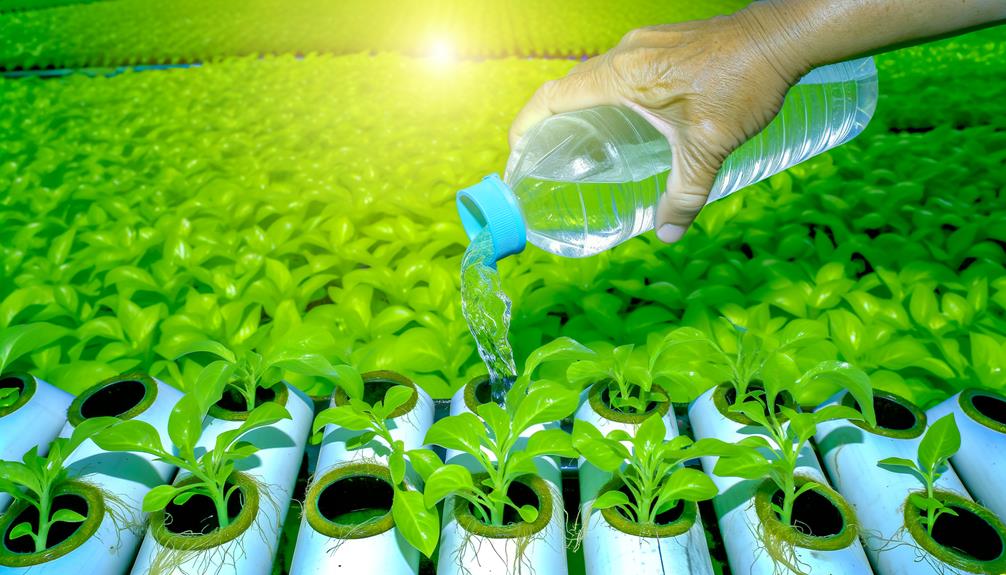
Once the water pump is securely installed and functioning, the next step involves preparing and adding the nutrient solution to guarantee ideal plant growth.
Begin by selecting a high-quality hydroponic nutrient mix tailored for the specific crops you are cultivating.
Dissolve the nutrient mix in water, adhering strictly to the manufacturer's concentration guidelines to confirm optimal nutrient availability.
Utilize a calibrated pH meter and electrical conductivity (EC) meter to monitor the solution's parameters, adjusting pH to a range of 5.5-6.5 and confirming EC levels align with crop-specific requirements.
Once the solution is prepared, introduce it into the system's reservoir, ensuring even distribution through the PVC piping network.
This meticulous approach confirms nutrient delivery is both efficient and effective, fostering robust plant development.
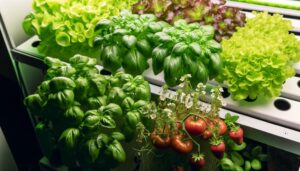
Plant Your Seedlings
Planting your seedlings in the PVC hydroponic system necessitates meticulous preparation to guarantee ideal growth.
Begin by thoroughly rinsing the roots to eliminate any residual soil, thereby preventing contamination.
Subsequently, position the seedlings in the net pots, making certain they receive adequate light and maintain consistent exposure to the nutrient solution for maximal development.
Seedling Preparation Steps
Initiate the seedling preparation by guaranteeing ideal germination conditions, which include maintaining precise temperature and humidity levels.
Utilize seedling heat mats to sustain prime thermal conditions, typically around 20-25°C, and employ humidity domes to retain moisture.
Select high-quality, disease-resistant seeds and germinate them in a sterile, nutrient-optimized medium such as rockwool cubes or coco coir.
Confirm the medium has been pre-soaked in a balanced pH solution to facilitate nutrient uptake.
Position the seeds at the appropriate depth, generally twice the seed's diameter, and provide adequate lighting, ideally 14-16 hours of photoperiod.
Monitor progress closely, guaranteeing seedlings develop robust root structures before transplantation into the hydroponic system, maximizing their potential for accelerated growth and yield.
Optimal Growth Conditions
Ensuring ideal growth conditions for your seedlings involves meticulous control of environmental variables such as light intensity, photoperiod, nutrient concentration, and ambient temperature.
Optimal light intensity should range between 400-700 PPFD (Photosynthetic Photon Flux Density) to facilitate efficient photosynthesis. A photoperiod of 16 hours of light followed by 8 hours of darkness is recommended for most seedlings to simulate natural conditions.
Nutrient solutions must be precisely balanced; typically, an Electrical Conductivity (EC) between 1.2-2.0 mS/cm is preferable. Ambient temperature should be maintained between 18-24°C for optimal enzymatic activity and growth rates.
Integrating automated monitoring systems can enhance precision, ensuring your PVC hydroponic system operates at peak efficiency, thereby fostering robust seedling development.
Conclusion
In conclusion, constructing a PVC hydroponic system necessitates meticulous planning, precision in material selection, and methodical execution. By understanding the different types of PVC hydroponic systems, growers can select the most suitable design for their space and crops. Proper maintenance and monitoring are essential to ensure optimal plant growth and prevent issues such as clogging or nutrient imbalances. With careful attention to detail, a well-constructed PVC hydroponic system can provide a sustainable and efficient method for cultivating healthy plants.
The procedural steps, ranging from the design phase to the introduction of nutrient solutions and seedlings, encapsulate an all-encompassing approach to modern agricultural techniques.
This endeavor, akin to the meticulous craftsmanship of yore, underscores the potential of hydroponics in revolutionizing contemporary farming practices, thereby contributing notably to sustainable agricultural advancements.